
 Using a chisel and hammer you get at the glazing from the side, being careful not to break the glass. Use a razor blade to get out last of the glazing remnants.
 My sister, home for Christmas, helping me out. This is my dad's workshop:


 Using a chisel and hammer you get at the glazing from the side, being careful not to break the glass. Use a razor blade to get out last of the glazing remnants.
  Existing weight in window channel. (I use the word, "channel," for both the openings at the sides of the window framing, and the openings on the sides of the windows themselves.)
 Cut you new rope to the right size for your window. Ideally you want to use 100% cotton sash rope (nylon will stretch over time). Despite an exhaustive search I could not find any, so I settled for a cotton rope with a nylon core. Tie a knot at one end of the rope and put it in your window channel. Nail through both the knot, and about 3 inches above the knot, to help hold the rope in place in the channel of the window. Once the ropes are secure in the window, loop the other ends of your ropes through the window wheels at the top (see picture below).
 You can insulate against drafts coming through your window wheels during the winter by using carpet padding, or something similar.
 Fill in the opening at the bottom and top of your window with maximum expanding "Great Stuff" window foam to prevent drafts. (Later, once the window weights, with their new ropes, are in place I will insert 2 inch foam board in this channel--between the opening/channel pictured here and the window trim--for further insulation.)
 Once both sides of your window have ropes in the channels, and you have sealed gaps in the window channel with "Great Stuff," loop the other end of the rope (the end not already nailed to your window) through the weight and tie a knot at the end--this knot will prevent the rope from slipping through your final two knots (see picture below).
 Here you can see how the original end knot will prevent the rope from slipping through the final two knots.
 Install the weight in the window channel. Use parafin (Gulf) wax, beeswax, or soap on the sides of your windows where they will rub against the window framing so to make it easier to open and close the windows.


 A layer of highest quality thin set mortar on the underside prevents pops and air bubbles, giving the floor a solid base on which to lay your tile.


 Surprised how well Glidden---the cheapest paint--covered. It covered better than Valspar's highest grade paint I had used on the house next door.


My neighbor was intent on replacing all these windows below, like you see on the top photo. This side of his house dominated the view from my house. To try and prevent it, I offered to paint them for the cost of materials:
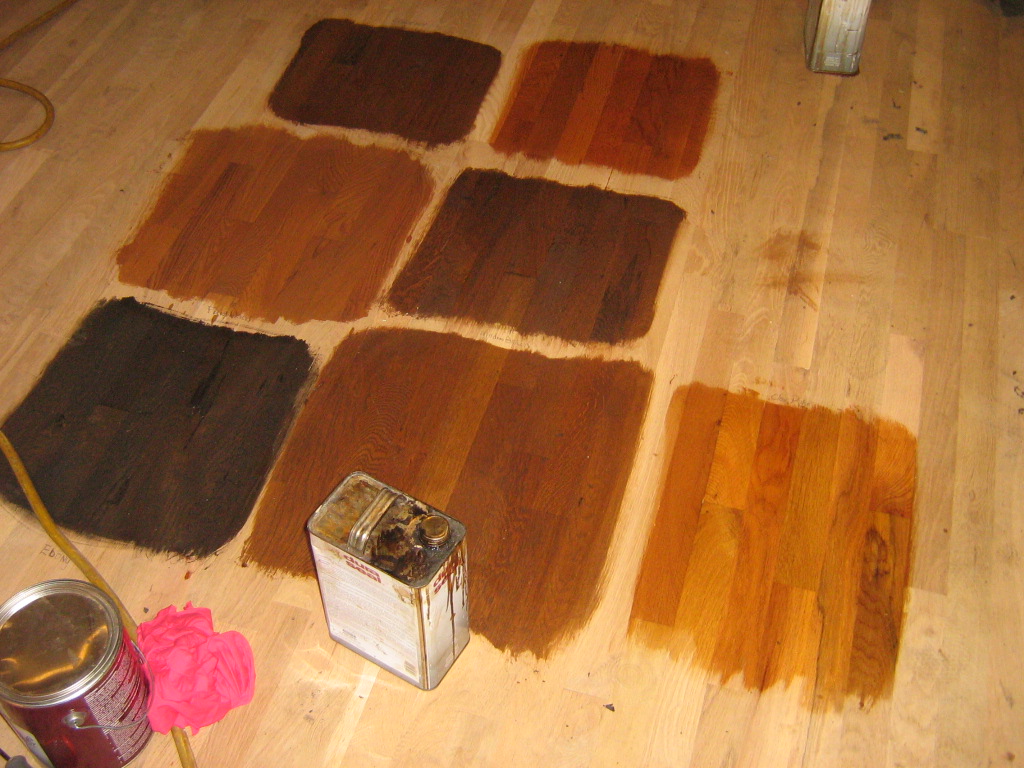
 The bank applied the ugly red stain and plastic polyurethane to all the woodwork in the house (seen on the right). I believe that the removing it exposed the original finish of the wood (on the left). Originally, they would have likely used a high quality Danish Oil type stain that penetrates deeper into the wood, rather than the cheap stuff most people use today, thus, perhaps the original stain is not so much affected by the Soy Gel?
 Lots of waste on drywall, but it is recyclable. Each 4X8 drywall piece has slight indentions at the end sides so that you can apply the fiberglass tape and put mud over the tape without creating a rise. Even with sanding, if you don't line these indentions up, you will get a slight bump in the wall along the seam which is very visible if the light hits just right. That is why there is so much waste, because you don't want to line up pieces that don't have the corresponding indented portion.


